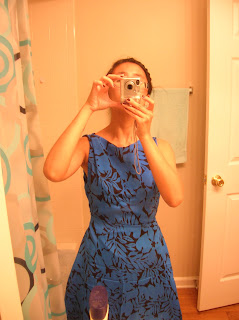
...unless, that is, you can afford to kill about 24 hours in the span of 2 days. OK, actually more like 16, but I haven't done the ironing yet and need to re-acquaint myself with the process. Yeah, ironing, wet-blocking, all that finishing stuff I was too bored to learn before plowing ahead to the next project. Still, 2 yards of less-than-40-inch-wide silky print, couple yards of lining, an invisible zipper (still hate those), and a few sessions with a measuring tape and a mirror. Result: dress! Wotcha think?
I'd show you the original pattern, but, um, I don't have one. Basically I cut the top out of lining first by using crude measurements (shoulder to natural waist for length; shoulder, bust, and waist measurements for widths). My first piece barely covered at the bust, so I cut a second piece that was about a half-inch to an inch longer at either side. Then I cut those same pieces out of the patterned fabric. (The collar, by the way, is actually just a shallow curve from shoulder to shoulder, with the depth of the curve adjusted after fitting the lining pieces.) Whatever was left over (about 50 by 36 inches of the silky print) became skirt (fold or cut to two 25x36 rectangles, fold rectangles along long edge, and use your waist measurement--or I suppose 1/4 of your waist measurement plus extra for seam allowances--for the top of the trapezoid, using the full width of the fabric to form your skirt hem 'cause, you know, I like to be able to move). Repeat process on lining but make slightly shorter.
The sewing's pretty straightforward. You know, sew lining to main fabric at collar and armholes, sew fronts and backs together at right edge, leaving left edge open for zipper. Sew skirt front and back together, leaving about a foot of left edge open for zipper. Sew skirt to bodice, using gathers or pleats (or I suppose darts, depending on fabric) as needed to match widths. Also, do avoid my fairy-hat-level mistake and fit the dress before you sew in the zipper. Also, again, if you shorten the bodice, you will need to readjust width to fit properly around your waist. Attach zipper and try not to punch anybody while struggling with trying to make it "invisible" (*snort*). Where zipper meets armhole, consider clasp, snaps, or actually sewing together about a centimeter of fabric up there. Now, here's the other important thing: try it on before you add finishing touches. If you can put it on without assistance and it doesn't look like a grocery bag, hem and iron away!
Here I just wanted to show off the front of the dress and the lovely lovely pattern of the fabric that somehow convinced me it was a good idea to work with silks (@#*^!). Because showing off is what I do (yes, intentional reference to at least 2 Steven Moffat heroes, damn them). And yes, I know my mother doesn't read my blogs, but I should tell her that her challenge is now complete...ish. Oh, crud! Forgot to take pictures of pink party dress! Eh, that's a problem for another time.


