Hello again, reader(s), and welcome to my quarantine kitchen.
Just kidding, I'm not really in quarantine, being one of the fortunate few who are considered "essential" workers but whose jobs, in theory at least, entail relatively little COVID-19 exposure risk. So needless to say, I haven't been spending a lot of time perfecting my pie game and my Zoom background while children rampage within earshot (cocktail hour, falling somewhere on a loose spectrum from 6PM to 9PM, on the other hand...). But Mad Scientist Husband has been doing the grocery shopping lately, and we have...ingredients.
When you're a gourmand who can't go out to eat anymore and life hands you breakfast cereals, amirite?
I present to you the Saturday Morning Breakfast Cereal Pie (was going to make trademark joke but can't find proper formatting so bleh). The template for said pie is my go-to key lime pie from Smitten Kitchen, which is about as no-fail as any pie can get in my chaotic paws. It only gets more, uh, fail-proof from there. Yeah. This totally looks like a great idea. For those of you playing along at home, I hope you're real bored.
You start with a box of Lucky Charms.
And now you separate about 2 cups of Lucky Charms into cereal and marshmallows.
Keep the marshmallows for later...if you can stop eating them. They don't taste or feel like marshmallows, but they go in the mouth real easy. Also what is this misshapen unicorn head thing?
Preheat your oven to 350F. I always forget this part and then start swearing when the oven isn't ready and my ingredients are.
Take out your aggressions on the cereal. You want a coarse crumb akin to graham cracker. Dump these in a large mixing bowl with a couple teaspoons of sugar and a pinch of salt. Melt about 6 tablespoons of butter and stir into the crumbs until evenly coated and loosely coalescent. Dump into the bottom of a 9-inch pie plate and work into a thin layer on the bottom and sides like you would a graham cracker crust.
Bake your crust for approximately 10-15 minutes until golden brown. If you did it wrong like me and ended up with too much butter to crumbs, you will end up with a sort of bubbling caramel layer. That's OK. Take that hot mess out of the oven (leave the oven on for the pie) and let it set a bit as it cools.
To a large mixing bowl or stand mixer, add 3 large egg yolks and whisk by hand or on high speed until pale and ribbony. Dump in a 14-ounce can of condensed milk and whisk some more until combined and creamy. Then dump in somewhere around 2/3 to 3/4 cup orange juice (whatever kind you have on hand--we have Tropicana with pulp, I think?) and whisk some more until combined and creamy but hopefully before it gets super bubbly or else you should really consider letting the bubbles settle before you dump it in your pie crust. Tasting note: orange creamsicle? We really hoped that flavor would stick around in the final product.
Dump your filling into your pie crust. If your crust is a little fragile and overbuttered like mine you may have some floaters and grease slicks. That's fine, bake it anyway, no one will know.
Bake in that same 350F oven about 15-20 minutes until the filling sets. We had some browning at the edges but that's because we had to bake a bit longer due to rogue butter keeping the custard liquid.
Remove from oven and allow to cool completely. Refrigeration helps here. I highly recommend it.
Whip about 3/4 cup heavy cream (unsweetened is the way to go here, you'll soon see why!) to soft peaks. Pull out your cooled pie, spread the cream over the top, and top (in a careful spiral pattern for maximum coverage) with the marshmallows you set aside earlier.
This pie can be served as is, which we did. Mad Scientist Husband claims the crust tastes like BJ's pizzookie. I have never eaten at BJ's so cannot corroborate.
It's better after a day or so in the fridge. The marshmallows...reconstitute??? And the texture gets malty like cereal milk. The slight orange tang gets overpowered by the pizzookie crust while fresh but when leftover takes on a Froot Loop character.
Is it amazing? Well, no. But when life hands you General Mills...
TheCraftyDoctor
Crafts and "arts" with a side of geek
Sunday, May 24, 2020
Sunday, January 13, 2019
Our One Fight
So, my iCloud is full. It's full for a lot of reasons, the most obvious being that Apple only allows 5GB of free storage and I refuse to pay for the privilege of storing a few extra cat videos. But it's also full because I have a stockpile of food adventure photos (sorry, the yarns are taking a mental health break) that I had meant to incorporate into this blog but never got around to. And the most striking of those have got to be the ostrich egg. Also known as the Scotch Ostrich Egg Fiasco. Also known as Our One Fight.
A little setup, of course. The ostrich egg was the result of 1-year-anniversary celebrations with Mad Scientist Boyfriend (now Mad Scientist Fiance, but that isn't part of the story). On a trip to the ostrich farm somewhere around the Santa Barbara area, we were tempted by the siren song of one very large, heavily armored encasement of albumin and cholesterol. Now, the obvious thing one does with an ostrich egg is, as we were informed, to drill some holes in the thick shell, siphon out the contents, and make a gigantic omelette or scramble. But why do the obvious? Somewhere along the drive back to Pasadena with a stop for brats and beer and ice cream in the middle, we, um, hatched the wonderful awful idea of Scotch eggs.
Now, a bit of background. I am an instinctive cook. What are our liabilities and assets? Great. Find out mid-recipe you don't have the right pan or a key ingredient? Improvise. One thing I never ever do is give up, because wasting food is bad, m'kay? Meanwhile, Mad Scientist Fiance is exactly what happens when you allow a mad scientist to take over a kitchen. All sorts of wild and wacky flavor profiles and ingredient combos? Check. But scientists are not invested in a single result, or else they're bad scientists. You see where this is going.
It was a busy week, and between anniversary trip, heat wave (I still maintain that temperatures above body temp are unnatural, dry heat or not), a busted AC, and planning for Camp Fangamer followed almost immediately by cross-country move, neither one of us was what you would call well-rested. Still, if we were going to do Scotch ostrich egg, we might as well go all out. Lacking a fryer that big, we settled on more of a Wellington method: wrap the boiled egg in sausage and a puff pastry and bake until golden. But, um, how exactly does one boil an ostrich egg?
If you said pop it in a large pot of water and just let it go for a couple of hours, you'd be partially right. We did...only to make a burr hole through which raw albumin percolated in a never-ending stream. So, back in the pot it went. By then it was about 1 AM, so we boiled the damn thing basically overnight and agreed to deal with it in the morning.
So, next morning and time to peel the monstrosity. It...kind of went okay?
Until I realized the sausage I had cooked the night before was simply too stiff to wrap around the still-jellylike egg white and the whole thing sort of broke apart the pastry wrapping.
So, now what? Put it away and think about the learning experience, says Mad Scientist Fiance! No, never, say I! Scotch egg or bust! It's never going to work, says he. Let's cut our losses and plan for the next egg. That's 40 bucks plus extra ingredients down the drain, I protest. Then you're doing it alone, 'cause I'm going to work, says he.
Over the next several hours, I proceed to tinker my own way. Sausage goes back in the pan with whatever dairy product we have on hand (I think it was milk?) and some of the crumbled and very slimy egg white. Remaining egg gets to stew in the fridge. Turns out the albumin makes a decent binder and the milk a good emulsifier, and before too long I have a fairly respectable, if oddly rich even for sausage gravy, sausage gravy. Lovely. Out comes the puff pastry, then a layer of sausage gravy, then a layer of more crumbled albumin bits, then the yolk, which is enormous and probably overcooked and by now has decided it needs no covering save a thin sulfurous patina or so.
Wrapping the monstrosity is...not easy, but eventually it settles into something of a proteinaceous football, which ends up back in the fridge for added stability.
It doesn't look all that much more stable after the fridging, but whatever. Arranges on baking tray and slices top "decoratively." Gordon Ramsay would be horrified. Then a layer of egg wash (because that's what this thing needs is more egg of the chicken variety to sacrifice to the ostrich gods), and in the oven it goes.
All in all the baking takes...30 minutes to an hour?
If you've never had Ostrich Egg Wellington, well, I don't recommend it. The egg is the sort of rich, gamy, unctuous horror that is very much better served whisked with a collection of herbs and veggies in a very large saute pan. But I promised a Wellington, damn it. Also, won't you admire my sausage gravy?
Screw it. Won't you admire my buttermilk biscuits, which made for much better Camp Fangamer road trip fare the next day. I needed something to sop up the excess gravy.
Well, it wasn't much of a fight. Because, really, there are no winners when Ostrich Egg Wellington is involved.
Sunday, September 30, 2018
Personal Pies
There's something to be said about me and fall. As soon as the light changes a little bit and (oh, right, I'm in deciduous tree territory again!) the leaves start to get crispy, I make for the pumpkin/apple/spice rack like a rat from a sinking ship. Except the thing about moving constantly for work is that you don't exactly have an abundance of space, or stomachs if it comes to that. Enter the slightly sad, slightly ridiculous, probably not one bit healthier desserts-for-one industry. Now, as someone who for some reason can never get a mug cake to work (Better with ovens than with microwaves? Who knows?), I was duly appreciative of this pumpkin pie for one recipe that came out in Bustle recently. I happen to have both 5-inch Pyrexes and ramekins in ample supply, so obviously I needed to make one.
Well, sort of....
Some days you make personal pan pumpkin pie 'cause there was a recipe. Except you say fuck that and alter the hell out of the recipe. This is that pie.
Using the ingredients available in my fridge/pantry and my own kick-ass pie crust making skills, I made this instead (note, you may use a blender/mixer, but...why?):
Crust:
6 tbsp flour
2 tbsp butter
approx. 1 tbsp water
pinch of sugar
pinch of cardamom
pinch of sea salt
Filling:
1 egg, lightly beaten
4 tbsp sugar
6 tbsp pumpkin puree
6 tbsp nonfat yogurt
1 tsp cinnamon
1/4 tsp nutmeg
1/4 tsp ground ginger
smithereens from 3 cloves
Preheat oven to 350F. Butter the bottom and sides of a 5-inch ramekin. Mix the flour, sugar, cardamom, and salt together, then cut in butter and work until mixture resembles buttery crumbs. Mix in water a little at a time until dough just comes together. Press into bottom of ramekin, lay ramekin on a baking sheet, toss in oven and bake for about 10 minutes.
Mix together eggs, sugar, pumpkin, yogurt, and spices until a thick, almost smooth liquid forms. Pour into baked crust inside ramekin. Pop back in oven and bake for 45 minutes or until the top just sets.
You may serve this in the ramekin, but if you want to take it out for display like I did, make sure to cool the damn thing thoroughly or else it will fall apart on you. When it seems sufficiently cool, run a small knife around the edges (all the way to the bottom), invert pie onto your hand if you like to live dangerously, and then immediately transfer to a waiting plate. Serve immediately if you like, or chilled, and/or topped with whipped cream or what have you (I have not). If anybody asks, I'll be off in a corner, finishing my pie.
Thursday, July 5, 2018
More green, less glowing
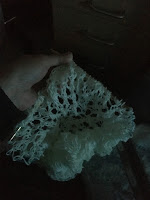
Hello, and welcome to the ______ post, wherein I show off pictures of ALL OF THE THINGS which have been languishing in the pile of wool I call my brain. And also some actual piles of wool. Or are these wool? I actually don't remember the fiber content of this shawl, but it consists of two contrasting skeins of Yarn Love: Marie Antoinette in the Paper Flowers colorway and Mr. Darcy in the Vitner Green colorway. I picked these up on an impulse shopping trip at the Renegrade Craft Fair almost exactly a year ago, as I recall, intending to make this pattern. And then, well, stuff happened. Like knit-300s and such. Even the short rows were...not short. So after a lot of being intimidated and whining and moaning and knitting a glow-in-the-dark beret, it was finally back to this.
To celebrate, I decided to recreate a melon bar. Just kidding. Except really, I decided to recreate a melon bar.
See, I'm in the midst of moving almost all the way back east for work, and to do a sort of cross-taper between leases I put my crap in storage, bundled up the cat and a few weeks' worth of supplies, and dropped in on Mad Scientist Boyfriend. His kitchen is...interestingly stocked (read: what is this flavoring and is it even edible?). While snooping around, I came upon a vial of melon flavoring that smelled just like the melon bars of my youth, and a challenge was born. Probably best not to leave me alone too long...
Now, for those of you who don't know what a melon bar is (um...it's not technically whitesplaining if I'm Asian, is it?), it's basically like a very dense and buttery Fig Newton flavored and filled with some sort of green melon confection. Like most sweet things I grew up with, it ain't very. Feeding it to my American friends was basically playing food roulette.
Not wanting to mess up a perfect re-creation, I decided to go the homage route.
For the cake, I wanted something relatively dense and buttery but not terribly sweet, so my immediate thought was Victoria sponge. Actually my immediate thought was "what are those Victorian tea sandwich cake thingies that you spread jam between the layers and I tried to make one once and ran out of cake pan?" I chose Mary Berry's Perfect Victoria Sandwich recipe because the name says it all. Except who the crap keeps self-rising flour around so I substituted AP flour and added the requisite 2 teaspoons baking powder and 1/4 tsp salt per approximately 6 oz of flour, taking the grand baking powder total to (gasp!) just over 4 tsp (trust me on this one, it works!). It took approximately 20 drops of melon flavoring folded into the batter to achieve that perfect green buttery flavor, but I had to restrain myself from licking the bowl, so that's good, I guess? Also, the batter is incredibly scary-thick (think more like Creature from the Black Lagoon meets cookie dough), so imagine my surprise when 5 minutes into the baking I had two tins of the most gorgeously rising cakes! P.S. They come off the edges nicely if you remember to butter said tins, so cleanup is surprisingly painless.
For the filling, I decided to improvise a honeydew melon jam. Now, have I ever made jam from scratch before? Nope. Do I have a clue how to use pectin? Also nope. So a quick intarwebs search turned up tips for how to make your own pectin-less preserves and I went for it. Hint: it involves a metric crap ton of the ingredient I don't like to overindulge in. Ever. One plastic tub of honeydew chunks (chopped to within an inch of its life), a half tablespoon of white vinegar, and 3/4 of a cup of sugar later, and I had a saucepan of low-boiling green goo. Speaking of lagoon creatures, amirite? Spike in as much Midori as you dare without messing with the texture, ladle your sweet sweet slime into a refrigerator-safe container, cover, and let chill until assembly. It might be alive come show time.
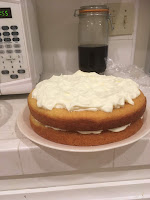
For the cream, I splashed about a tablespoon of Midori into 300ml of heavy whipping cream and gave my arms a workout. Now, you may ask, "why the crap does this cake have a cream top? No self-respecting Victoria sandwich has a cream top!" My friends, that is because I am a blithering idiot. Not having a wire rack to cool my cakes on, I decided to cool mine, FACE-DOWN (*facepalms*) on sheets of wax paper. Goes to peel off wax paper, strips off top of cake. Never fear, we'll just use a bit of cream to fence in the jam in the middle, and then use the remaining cream to cover our mistakes. Everybody likes a foam top on a naked Victoria sandwich, right? Right??? That's not sun tea in the jar behind the cake: why are you asking?
Still, Mad Scientist Boyfriend informs me that not everyone can make a Midori-spiked honeydew melon jam with no pectin on their first try, so at least I did that right! I give you a few moments to admire my layers. Behold them! Be-hold them!
Tuesday, April 17, 2018
All Things Green and Glowing
This is unfortunately a very short and disjointed post. Bear with me. There was simply too much cool stuff going on and not enough time/motivation to blog it all.
That and...one day I'll finish this hat. Attempt #1 was simply way too big and was going to run me out of yarn, so I had to frog it. But without further ado, and only a whole month late, this was how I spent my St. Patrick's Day weekend.
Take UV light source (like, say, the sun, or a light box if you happen to be in someone else's lab at the moment).
Shine onto glow-in-dark yarn.
Bring project into dark room (like, say, a microscope room), and watch it morph into a deep sea anemone.
Actually, I'm not sure deep sea anemones are this badass.
Follow up this performance by making Guinness chocolate cake with whiskey-infused cream cheese frosting. Variations of the recipe can be found all over the intarwebs, apparently, but I personally like putting booze in baked goods in such a way that it doesn't all cook off. I think this was supposed to be a foam top-like frosting, but I had so much fun frosting the cake that I covered the whole thing instead (in other words, I love baking but hate decorating and wish someone would make my cakes pretty for me, but alas mad scientist boyfriend doesn't seem all that interested in the decorating part either...).
Also I'm making it my life's goal to convert people to the gospel of the Meyer lemon. But that's a story for another day. Maybe in less than a few months' time, even.
Tuesday, January 9, 2018
You'll Never Shine If You Don't Glow?
To be honest I haven't had a lot to blog about lately. Well, not as far as my usual blog fare goes, in any case. If you've been to my oh-so-exciting Ravelry page, you've probably noticed my totally unchanging "wip" status on Baridee shawl dating back to some heat wave or another. Yep, it's still on the needles. Nope, I have no idea when I'm going to work up the gumption to get it off the needles. The medical profession, my friends, is an abusive husband, and a one-year fellowship is no exception to that rule.
Which is not to say that there haven't been a few pie experiments, a boozy cream puff or two dozen, some truffle disasters, and a whole lot of shenanigans in the process. Just...maybe not exactly Pinterest-level results. Unless "nailed it!" counts...? Witness "chess pie." This was a joint venture that will eventually need to be repeated. If for no other reason than to preserve the dignity of both parties involved in the concoction of such a diabolically bad pun.
But we were speaking of glowing. Well, I was. You'll just have to keep up.
Part of my Christmabirthdaykah present from mad scientist boyfriend* was glowing yarn. No, seriously. It. Glows. In. The. Dark.
There appears to be a sort of worsted-to-aran weight and a sort of fingering-to-sport weight. The Red Heart will probably have to get incorporated into something practical, like a hat band or mitts so caution-tapey that they can even tell Southern California drivers in a rainstorm to please, for the love of all things holy, DO NOT RUN OVER THIS PEDESTRIAN!!! The lighter stuff, though...
My first thought was hair accessory, since there isn't that much of it (somewhat less than 200 yards, I think). Basically a miniature triangular or rectangular shawl. But then, a miniature shawl would last about 20 seconds in my hair and end up in a grubby blob on the floor thereafter. So while a glow-in-the-dark-not-a-wedding-veil was an appealing idea on paper, let's get real here. Let's talk lace hat/snood things.
Remember Blackberrying? I almost didn't because I lost the actual beret at Banc restaurant/bar in Kips Bay/Murray Hill during an office holiday party. Looking back over my "pattern," I think it's time for a rewrite. With actual instructions. Which I will actually follow this time. Since we're talking a finer-gauge yarn, the weave should be considerably more open to give it that lacy not-a-veil effect to go with the eerie green glow.
I had so many other project ideas in my head when I first moved out here, but somehow this is what stuck? Oh well. I blame the chicory-blended coffee that was also part of Christmabirthdaykah present. The way to a girl's attention span. Besides, who doesn't want glow-in-the-dark clothing and accessories?
And here concludes my first piece of "creative" prose writing in an extremely, unconscionably long time. Till the next time, which should be sooner, I sincerely hope....
*darling, if you're reading this, I've finally updated my blog!
Monday, September 4, 2017
#impulsecaramel
Herein I attempt to recreate a Wednesday night post-work recipe for coconut milk caramels.
Why post-work? Because I realized our international fellows were finishing their rotations and the next day was their last day on duty.
Why coconut milk? Because that was possibly the only thing left in my fridge. The Silk "original" sweetened version because it's the only one I can find at the Korean grocery store down the block.
Added bonus: this recipe is what I like to call "fail-safe." Because you don't need a candy thermometer, just a good eye and a lot of patience. I suspect you can even make it while nursing a glass of wine, though 1) not me, I'd end up coated in kitchen napalm, and 2) I think I was motivated by sheer desperation, which is the true mother of invention, rather than alcohol.
What you will need:
2 heavy-bottomed saucepans, small to medium sized
1 loaf pan, lined with parchment paper
1 cup coconut milk
4 tablespoons butter
1/4 cup light corn (Karo) syrup
1 tsp sea salt
3/4 cup granulated sugar
1/2 cup water
Line your loaf pan with parchment paper and set aside.
In one of your pans, bring coconut milk, butter, corn syrup, and sea salt to a low boil and stir until dissolved. Keep over low heat while you do your napalm-making.
To your other pan, add sugar and water and turn up the heat to about medium. Cook until the mixture turns thickened and bubbly and dark amber in color, occasionally scraping it off the sides of the pan with a silicone spatula if you value your pan.
Add your sugar mixture to your milk mixture, stirring constantly, and bring up to medium heat. Yes, you will form lumps. Yes, they will dissolve.
Continue to cook your caramel, stirring constantly, until it boils, thickens, and coats your spatula. Once it reaches the consistency of a thin custard (strings, rather than straight-up drips, off the spatula), cook another 1-2 minutes and then remove from heat.
Pour slowly into prepared loaf pan. Slowly to avoid napalming yourself, and also to allow the bubbles to settle.
Allow to cool to room temperature in a relatively non-humid place if possible. Because caramel is "approximately <5% water and extremely hygroscopic" (credit for that quote goes to my mad scientist boyfriend), it will act like a sponge on steroids. I used my (very much turned off!) oven since we're in the middle of a heat wave, but having cooled caramel on the kitchen counter in New York, I suspect most normal room climates should be reasonable.
When your caramel block reaches room temperature or you're really itching to go to bed because it's 11PM on a school night, stick it in the fridge to chill overnight (or at least 2 hours).
The next day, break out the cutting board and a greased knife (any oil will do, including olive which is what I usually have lying around), cut a shit-ton of wax paper squares for wrapping, and then remove your caramel from the fridge and part it from the parchment paper.
Working quickly (mine started to get goopy at the 15-minute mark in 80+ degree Fahrenheit temperatures and 80% humidity so plan accordingly), cut candies into approximately 1-inch by 2-inch rectangles and wrap them in wax paper.
Serve to your favorite departing international fellows as a token of appreciation, along with the giant potluck feast resulting from EVERYONE deciding to bring food.
Makes approximately 40 candies. I think. One of these days I'll actually count it.
Subscribe to:
Posts (Atom)